Keyence FS-V31 - Dual Display Digital Optical Sensor
There are many digital optical sensors available out there, but Keyence's optical sensor really worth mentioning.
src="http://pagead2.googlesyndication.com/pagead/show_ads.js">
Let us get straight to the features:
Mega Power
FS-V31 comes with a feature called mega power. Just like the name itself, it indicates the strong light source emitted from the digital sensor. It is by far the most powerful beam in the industry and 64 times stronger than Keyence's conventional digital optical sensors. This feature can be coupled with DSC to become extreme dust prevention sensor.
DSC (Dynamic Stability Control)
If you are using Keyence FS-V31 with thrubeam optical sensors, this feature can be a great help to prevent dust from causing down time. The set point of the optical sensors will change accordingly depending on the environment or the amount of dust sticking on the optical sensor head.
High Speed
Keyence FS-V31 comes with a high speed mode with response time 33 micro seconds. It can detect aprroximately 32000parts/second with the high speed mode on.
Easy Setting
If you are new in the industry, then Keyence optical sensor especially FS-V31 is suitable as it is easy to use and long lasting. The setting is so easy that a kid could do it with no problem. Press set once with the object presense and press set again without the object. That's it. Setting is done.
1 point setting (Set Percentage)
This is also another great feature of Keyence FS-V31. It can be programmed to automatically set it's set point by just pressing set for 1 time. Every time the sensor fail, you just need to press set once and that's it. You are back on track.
Timer/Delay
Keyence FS-V31 offers quite a variety of timer. Depending on your application, this delay/timer can be useful.
LED Display
The LED display of Keyence FS-V31 is one of features that is beneficial. The display is clear and unlike LCD panel used by other manufacturers, it has longer lifespan. LCD depends on the backlight and you will notice that the display become blurred after a certain time whereas keyence latest digital optical sensor will maintain the display. As clear as new.
S-APC Circuit and 4-Elements LED
This technology used in Keyence's optical sensor FS-V31 will maintain the stability of detection through standard emission of light beam over long period. The lifespan will not be shorten by the usage of extra powers due to the usage of 4 elements LED.
Find out more about the services at Keyance.
Check out the settings and specification of fs-v31.
Sunday, February 15, 2009
Thursday, February 12, 2009
Keyence
Keyence - Everything you need in automation
While the name might be new or strange to most end users, it is quite famous in automation industry through reputation and supports provided. Among many suppliers, I favor Keyence even though the price of the products such as sensors is slightly higher than most of the rest.
There are a few reasons why I favor keyence compare with others:
Direct Approach
Keyence sales engineer are technically well trained and able to provide quality automation solution most of the time. Through this service, customers get the highest advantage due to faster feedback and time saving. As an engineer, you definitely have a bigger job scope than just buying and replacing sensors. As time is really an important factor in production, you can't waste too much time waiting for reply and sourcing for the right parts. This is the time when you will find Keyence most useful. The Keyence sales engineer will normally feedback to your question as soon as possible and most of the time within a day. If there is any technical issue regarding the parts you purchase, you can call up nearest keyence branch and deal directly with the sales engineer and expect a speedy reply. Whereas, if you were to purchase from a trading house, you will find difficulties when urgent technical support is required. Most of the time, traders do not have the expertise to resolve your problem as what they do is just selling. That will actually increase the down time of your machines which cost a lot more than the amount you tried to save.
Trial Unit
Other than providin faster feedback through direct sales, keyence also offer trial unit to their customer. This actually show their confidence in the products they offer. If you think that you have no confident with the products proposed to you, you can always request for a free trial unit. During this trial period you can actually install the trial unit to your machine and monitor the progress. If the results is satisfying, perhaps you should consider purchasing it. Otherwise, you can just return it and Keyence does not charge you any additional fees for that. Apart from that, keyence has the most friendly and humble sales person in the industry. Many suppliers actually require customer to purchase in bulk in order to gain product support. In Keyence, even it is just a single unit, they will still provide excellent service to their customers. Good job Keyence!
Faster Delivery Service
Apart from all the excellent services provided, Keyence make it even better when they actually provide you a very fast delivery service. The products are shipped from Japan warehouse to worldwide. Even though the products come from Japan, most of the local branch actually keep stocks of most commoon products. Hence, the 1 day delivery service is always possible if the stocks are available.
Product Demo
The last but not least, the things that i like most about keyence is, they do products demo on most of the products the sales engineers proposed. They actually walk the talk. Most of the time they show some impressive demo and you can see that keyence really trained their sales engineer so well. Other than discipline, the sales engineer are trained to be creative as well. You will really see interesting demonstration of the products with Keyence sales engineers. That will actually help to generate ideas on improvement projects.
Now don't you think Keyence is going to be useful supplier?
Thursday, February 5, 2009
Sensor Selection Guide
Sensor Selection for Beginners
Because there are many sensors out there, there are 5 rules that you can use to shortlist the suitable sensors for your application. This is generally a guide which can be used to select any kind of sensors. Not only optical sensors.
Lets say you have a project to do pin counting of integrated chips and you are sourcing for new sensor to complement the project. You might want to start with these:
Target Object
Sensors are all the same in the sense that they all do detection and sensing. However, the stability of the output generated will be different. If your object is as small as a pin size, then it will not be wise to use a general fiberoptic sensor head. The general fiberoptic actually has aperture angle of 60 degree. In this case, we have to select from a range of small beamspot sensors. Some laser sensors in the industry offer extremely small beamspot size such as 70 micron. An optical sensor can also be used to detect small object as certain types produce beam spot of only 0.1mm. That is fine enough for most application.
Detecting Distance
It is very important to know the range of detecting distance which is acceptable. Detecting distance means the distance between the sensor head and the object. The distance should allow the sensor to operate perfectly. As I were saying, both optical sensor and laser sensor can actuall produce small beam spot in order to detect..small pin for example. However, for an optical sensor to achieve such a small beam spot, the distance between the sensor and the object has to be very near. When i say very near, it is like 1/2 inch. If your machine does not allow you to mount your sensor this near, then you already reduce your two options into only one. That is.. Laser sensors. Some known laser sensor in the industry can actually produce a beam spot of 50micron at a distance of 7cm away from the object.
Environment
Is it a dusty environment? Is it high temperature? This is also a very importance thing to take note. Say if your machine produce heat of 500 degree F, your sensor should start to melt the minute you turn on the machine.
Mounting space
Now that you have figured out the beam spot and also the detecting distance, you probably want to have a look at the extra space your machine has. Some small machine are just too compact. Some have no problem at all because of the large free space available for mounting. Some already have mounting bracket ready. It is the most common for people to have L shape bracket ready to be used for mounting purpose. There are a lot of sensor which are designed to match the bracket easily. If you cannot have a sensor that stand vertically, then you probably want to get those that are laying down horizontally. Generally this design is called space saving flat type sensor. Bear in mind that, there will be time tthat not even one sensor will suit perfectly to your mounting requirement. In that case, you will have to customize a moutning bracket and tools to fit it in. It is unavoidable as there are many custom machines around.
Budget
Know how much you have in your pocket so you so you wont end up with costly sensor you can't afford. Bear in mind that, there are more than one sensor which can be used for a single application. Take your time, look for one that is mercy to your pocket. If you are really having budget constraint, please remember that you can try to reduce the cost simply by modification on the mounting and perhaps find a way to reduce the detecting distance.
Now let us see how five of these guides will help you to save time and selecting suitable sensor. With the information you have now, you can simply call up you supplier and just say:
"Hey, I am looking for a 0.1mm beam spot size with detecting distance of at least 5cm detecting distance which can stand high temperature and space saving. I only have $300 to spend on this"
It's as easy as that and it saves you time and energy.
Hope this sensor selection guide helps you in certain ways.
Fiber Optic Sensor Selection Guide Part 2
Alright, so we have already covered single core, multi core, FEP sheated, high flex and armoured type of optical sensors. We are going to look into more.
Lets start with:
Optical Sensor Selection Guide Part 1
Cheers.
Lets start with:
- Heat Resistant Optical Sensor. In some places, the heat generated by machine can reach up to hundreds of degrees (more than enough to boil water). If normal optical sensors are used in places like this, the cladding will melt in seconds. The heat resistant optical sensors can withstand heat ranges from 212°F ~ 662°F.
- Liquid Level Detection Optical Sensor. Just like it's name. It is used to detect liquid level. There are a few types of optical sensors which can be used to detect liquid level. If you wish to detect level without touching the liquid, then a clip type can be used, where the optical sensor is clipped at the external tube. Otherwise, use immerse type of optical sensor which require positioning (position the sensor at the desired level).
- Space Saving Optical Sensors. For many application space is a concern and many machine makers and engineers tend to use normal optical sensors which actually cheaper. The usage of normal optical sensors at places like this cause a lot protrusion of the cable. Hence, it actually increase the chance to break it due to recklessness. Pictures will say a thousand words on this. As shown below, the pic on the right is mounted right angle which is actually protected by a nut. It actuallly reduce protrusion which lead to high maintenance of due to broken optical sensor head. There are many more space saving sensors out there. Flat type, miniature type, zero space..to name a few. Depending on the space constraint that you face, you can actually select from a wide range. Look for your supplier and ask for Space Saving optical sensor. It doesn't cost much anyway. But it saves you time and money in long run.
- Transparent Target Detection Optical Sensors. The most common optical sensors used in various industries are reflective and thrubeam type. However, these two sensor actually have problem detecting clear transparent object. For a better detection of transparent object, a retro-reflective optical sensor is used. Retro-reflective optical sensors uses a reflector to complete the detection. The light beam penetrate the object and reflected by back the reflector. Through the reflection, the light beam actually passes through the transparent object twice, which actually creates much more difference of light received during absense and presence of object.
- Area Beam Optical Sensor. Area beam optical sensor actually produce a considerably wide area for object detection. Normal optical sensor has a coverage of limited area of detection due to the relatively small straight line of emission. Because of this, objects to be detected must pass through at the same position every time. However, if area beam optical sensor is used, a greater tolerance of object position is possible. Sometime, vibration of machine itself caused the position of the object to be unpredictable.
- Small Beam Spot Optical Sensor. Normal optical sensors has light dispersion of 60 degrees which made it almost impossible to detect minute object. Small beamspot optical sensors produce beamspot up to 0.1mm. For application such as pin counting or IC checking, this sensor will provide a very stable detection.


Optical Sensor Selection Guide Part 1
Cheers.
Wednesday, February 4, 2009
Fiber Optic Sensor Selection Guide Part 1
Fiber optic sensors selection is very important in order to achieve better reliability and lifespan. You might think that there is a universal type of fiberoptic sensor head which can be use in all application. But too bad, this is not the case. The fact is, the designers of sensors actually come up with more than hundreds kind of sensor to suit different situation. While some fiber head can be used in many application, it does not mean that it is the most suitable.
Let me list down a few types and when to actually use each of them.
Optic Sensor Selection Guide Part 2
Cya!
Let me list down a few types and when to actually use each of them.
- Single core fiber optic sensor head. This is actually a conventional fiber optic sensor head. It is normally used for a direct sensing where there is no mounting complication and minimal bending of the fiber head. Using this sensor head in harsh environment is not recommended as it break easily due to recklessness of staff during cleaning or maintenance activity. This fiber sensor head normally has a bending radius of 25mm. More than that will actually stop the lights from passing through the fiber core and detection is impossible.

- Multi-Core fiber optic sensor head. Some major indutry such as Keyence call it ToughFlex. It has 217 cores which made it hardly affected by excessive bending. If the mounting space is limited and a lot of bending is required, then this fiber sensor will suits the best. The more the cores of the optical sensor head the better the bending radius. One of the major brand of automation parts actually come out with optical sensor head which has 613 cores. Impressive!

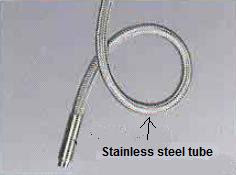
- Armoured type. This type of fiber optic sensor head is normally shielded with stainless steel armour. This additional shield surrounds the cladding which cover the cores. If you suffer from high maintenance cost because of broken fiber, this should solve your problem a little. Of course, the initial cost to implement this sensor head is higher, but in long run, it should be beneficial as you will be saving maintenance cost and also lesser down time.
- High Flex Fiber optic sensor head. If you installed optical sensor head on moving parts, most probaly you will notice it wears out very quickly. It is actually caused by the friction between the core and the cladding due to frequent movement of the optical sensor head (robotic arm for example). High flex sensor head will do a great job in this situation. It friction between the cladding and the core is actually cushioned by a soft material... ahh... i have forgotten what it is. But the point is, there is a cushion between.
- FEP-sheathed. If you are dealing with machine which involves chemical and you are worry that the chemical will reduce the lifespan of the sensor rapidly, worry no more. This fiber head is covered in a FEP tube to stand harsh environment. It has a great resistant to chemicals and oil which made it the only type of optical sensor which can be use in oily and heavy chemical environment.
 Take note that there are semi-transparent coating covering the sensor. This is an example of thrubeam sensor detecting presence of drill.


Optic Sensor Selection Guide Part 2
Cya!
Optical Sensors
This is my first post in this blog. So i am going to briefly explain how can I help you in this blog. i have been in the industry for many years and everything that I post and going to post are based on experience and knowledge. My job is to provide automation solution and to meet a lot of engineers out there.
I know there are a lot of engineers out there whose job is just to maintain some machines. By maintaining, it simply means changing the old part when it is broken or worn out. You keep doing that for years until one day you decided to impress your boss by making the machine better. Better in the sense of productivity or reliability.
Where can you actually start? Maybe you are required to improve the machine and this is your chance to shine. Rather than just staying as a "changing parts" engineer, you finally have the chance to be more than that.
Well, the chance has finally arrived, but what you gonna do? What will you do first? If your machine uses sensors, i would suggest to start from there. Normally there are many rooms for improvement.
I am going to provide you some basic knowledge on sensors in this post. If you are already an expert, please come back again as I will be posting more on application basis soon. Beginners is always priority! you old veteran in the industry can wait.
Let us start now...with Optical Sensors. The reason I choose to start with optical sensors is not because it is the most widely used, but it can actually fit into most applications (i say most, not all).
Like any photoelectric sensor, optical sensor has two points. One is the transmitting point where light is emitted and the other end will be the receiving end. Generally there are 3 types of optical sensor, through beam, reflective and retro reflective. Each of these type has different advantage.
1.Through Beam Sensor - This sensor is suitable for absolute detection of solid object. The transmitter and receiver are pointing to each other directly in order to create a straight light path. Whenever there is any object which passes by the light transmission path, the amount of received light by the receiver will be zero or reduced. As conclusion, the sensing method is interupting the light source received by the receiver.

Pic 1. Without object
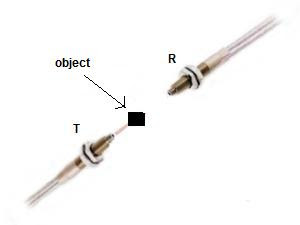
Pic 2. With bject interupting the light path
2.Reflective Sensor - This type of sensor if suitable to perform colour differentiation. The transmitter and receiver of this sensor are parallel to each other. The mehtod of detection is through reflection of light emitted by the receiver.

Pic 3. Reflective Sensor
If you were to use reflective sensor, take note that this sensor actually does detection base on quantity of light that is reflected back to the receiver. If the light source used is red LED, you will face problem to differentiate red and white objects. Red and white actually reflect back almost the same amount of light. Refer to the colour differentiation chart below.

Pic 4. Colour differentiation chart (Red LED light source)
It is easy to use this chart. I was told by my teacher to actually calculate the excess gain in order to make sure the detection will be stable. But hell, that is really dumb. Just look at the difference in wavelenght will do. The more the difference between two colours, the better detection you will get.
2.Advantage of using optical sensor
Flexible installation
–There are various kind of small size optic cable which can actually fit into small spaces.
-Stably detect small objects.
-Stable detection in harsh environment
-Heat resistance. If you need to put a sensor into an oven or any high temperature place, glass fiber is what you will be looking for. It can even stand up to 350 degree celcius.
3.Impressive amplifier
In optical sensor, amplifier is the source of the light where the fiber optic cable is plugged in. If you are talking about reliability or productivity, a good amplifier can actually help a lot but it will cost you a few bucks more.

Pic 5. Digital fiber optic amplifier
The digital amplifier normally has two digital values as shown above. The red value is the unit of light that is received. The green value is the threshold value (set point). If you are using old amplifier which has no digital value and you suffer high maintenance, I strongly suggest you to convert it to the digital amp. It give you a clearer picture of what is actually wrong with the sensor. Made it easier for you to diagnose the root problem.
The most common problem of using optical sensor is high maintenance cost to change the optical head periodically. But the fact is, the problem does not necessarily be the optical head. It maybe just dust or slight leakage of light. If you are using conventional trimmer type of amplifier, you probably cant do anything other than trimming the button clock wise and anti clockwise. When nothing happen, you change the head. By luck, if it works, then you pass. If it does not, then you change the amplifier as well. Imagine how much it would cost if everyone is doing the same thing. Things will be different if a digital amplifier is used. You have the red values which actually helps you a lot. For example, if the detection become unstable, just check the red value. If it shows reading, then you can just set the threshold value to stabilize it. If the red value is extremely low, it can either be dust or broken fiber. Check either 1. If it is the latter, try increase the power of the amplifier. Might be able to compensate the broken fiber. At the end.. you dont even have to change anything. Saving you time and cost.
I will stop here. If you have any question please post it in the comment section.
Subscribe to:
Posts (Atom)
