I know there are a lot of engineers out there whose job is just to maintain some machines. By maintaining, it simply means changing the old part when it is broken or worn out. You keep doing that for years until one day you decided to impress your boss by making the machine better. Better in the sense of productivity or reliability.
Where can you actually start? Maybe you are required to improve the machine and this is your chance to shine. Rather than just staying as a "changing parts" engineer, you finally have the chance to be more than that.
Well, the chance has finally arrived, but what you gonna do? What will you do first? If your machine uses sensors, i would suggest to start from there. Normally there are many rooms for improvement.
I am going to provide you some basic knowledge on sensors in this post. If you are already an expert, please come back again as I will be posting more on application basis soon. Beginners is always priority! you old veteran in the industry can wait.
Let us start now...with Optical Sensors. The reason I choose to start with optical sensors is not because it is the most widely used, but it can actually fit into most applications (i say most, not all).
Like any photoelectric sensor, optical sensor has two points. One is the transmitting point where light is emitted and the other end will be the receiving end. Generally there are 3 types of optical sensor, through beam, reflective and retro reflective. Each of these type has different advantage.
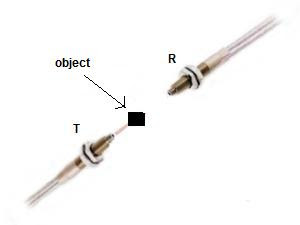
1.Through Beam Sensor - This sensor is suitable for absolute detection of solid object. The transmitter and receiver are pointing to each other directly in order to create a straight light path. Whenever there is any object which passes by the light transmission path, the amount of received light by the receiver will be zero or reduced. As conclusion, the sensing method is interupting the light source received by the receiver.

Pic 1. Without object

Pic 2. With bject interupting the light path
2.Reflective Sensor - This type of sensor if suitable to perform colour differentiation. The transmitter and receiver of this sensor are parallel to each other. The mehtod of detection is through reflection of light emitted by the receiver.

Pic 3. Reflective Sensor
If you were to use reflective sensor, take note that this sensor actually does detection base on quantity of light that is reflected back to the receiver. If the light source used is red LED, you will face problem to differentiate red and white objects. Red and white actually reflect back almost the same amount of light. Refer to the colour differentiation chart below.

Pic 4. Colour differentiation chart (Red LED light source)
It is easy to use this chart. I was told by my teacher to actually calculate the excess gain in order to make sure the detection will be stable. But hell, that is really dumb. Just look at the difference in wavelenght will do. The more the difference between two colours, the better detection you will get.
2.Advantage of using optical sensor
Flexible installation
–There are various kind of small size optic cable which can actually fit into small spaces.
-Stably detect small objects.
-Stable detection in harsh environment
-Heat resistance. If you need to put a sensor into an oven or any high temperature place, glass fiber is what you will be looking for. It can even stand up to 350 degree celcius.
3.Impressive amplifier
In optical sensor, amplifier is the source of the light where the fiber optic cable is plugged in. If you are talking about reliability or productivity, a good amplifier can actually help a lot but it will cost you a few bucks more.

Pic 5. Digital fiber optic amplifier
The digital amplifier normally has two digital values as shown above. The red value is the unit of light that is received. The green value is the threshold value (set point). If you are using old amplifier which has no digital value and you suffer high maintenance, I strongly suggest you to convert it to the digital amp. It give you a clearer picture of what is actually wrong with the sensor. Made it easier for you to diagnose the root problem.
The most common problem of using optical sensor is high maintenance cost to change the optical head periodically. But the fact is, the problem does not necessarily be the optical head. It maybe just dust or slight leakage of light. If you are using conventional trimmer type of amplifier, you probably cant do anything other than trimming the button clock wise and anti clockwise. When nothing happen, you change the head. By luck, if it works, then you pass. If it does not, then you change the amplifier as well. Imagine how much it would cost if everyone is doing the same thing. Things will be different if a digital amplifier is used. You have the red values which actually helps you a lot. For example, if the detection become unstable, just check the red value. If it shows reading, then you can just set the threshold value to stabilize it. If the red value is extremely low, it can either be dust or broken fiber. Check either 1. If it is the latter, try increase the power of the amplifier. Might be able to compensate the broken fiber. At the end.. you dont even have to change anything. Saving you time and cost.
I will stop here. If you have any question please post it in the comment section.
No comments:
Post a Comment